
Rate Limiting in Spring Boot with Bucket4j: Token Bucket Algorithm per Client

A partner company starts integrating with your API. On day one, their developer writes a loop to load test data, and suddenly your API answers slowly for every other client. Nobody attacked you: one client simply had no limit. Rate limiting controls how many requests each client may send in a given time. Requests within the limit are served; the rest get the status code 429 Too Many Requests.
This post compares the common rate limiting algorithms, then implements a token bucket per client in Spring Boot with the Bucket4j library.
Why Rate Limit Your API?
- Fair use: one client’s traffic can’t slow down the API for everyone else.
- Protect expensive resources: database queries, calls to paid third-party APIs, and CPU-heavy work.
- Security: rate limiting is one of the defenses against Unrestricted Resource Consumption, number 4 in the OWASP API Security Top 10, and it slows down brute-force attacks on login endpoints.
- Business plans: a free plan with 10 requests per minute and a paid plan with 1,000 is a rate limit with a price tag.
What it won’t do: stop a large distributed denial-of-service (DDoS) attack. By the time a request reaches your application, it has already used your network and your servers. That protection belongs at the network level, in a CDN or a cloud firewall.
Rate Limiting Algorithms Compared
- Fixed window: count the requests per client in each calendar minute and reset the counter when the minute ends. It’s simple and cheap, but a client can send the full limit at 12:00:59 and again at 12:01:00, twice the limit within two seconds.
- Sliding window log: store the timestamp of every request and count those in the last 60 seconds. It’s exact, but it stores one entry per request.
- Sliding window counter: combine the counts of the current and the previous window, weighted by time. It’s a cheap and close approximation of the sliding log.
- Leaky bucket: requests enter a queue that is processed at a constant rate. It smooths the traffic, but bursts wait in the queue or are dropped when it’s full.
- Token bucket: a bucket holds tokens; each request takes one, and tokens are added back at a fixed rate. It allows short bursts up to the bucket’s capacity while keeping the average rate under control.
The token bucket is the most widely used, because real clients are bursty: a mobile app opening a screen sends five requests at once, then nothing for a minute.
How the Token Bucket Works
Imagine a bucket with a finite capacity. A refiller adds tokens at a fixed rate, and tokens that arrive when the bucket is full are discarded. Every request takes a token out. When the bucket is empty, the request is rejected until the refiller adds more tokens.
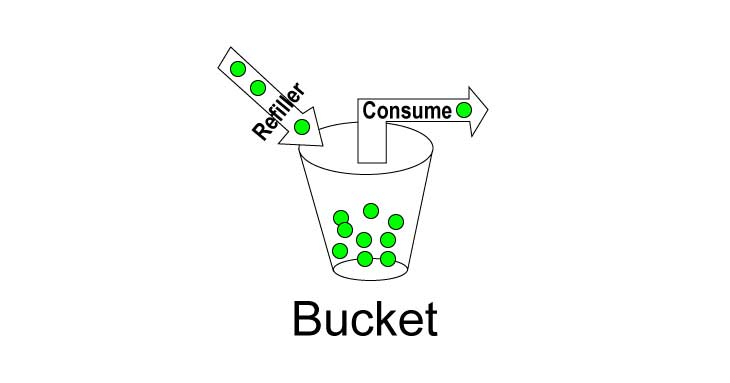
Two numbers define the limit: the capacity (the largest burst a client can send) and the refill rate (the long-term average).
Add Bucket4j to Your Project
Bucket4j is a Java rate limiting library based on the token bucket algorithm. The Java 17 build of version 8.21:
1
2
3
4
5
<dependency>
  <groupId>com.bucket4j</groupId>
  <artifactId>bucket4j_jdk17-core</artifactId>
  <version>8.21.0</version>
</dependency>
Or with Gradle:
1
implementation 'com.bucket4j:bucket4j_jdk17-core:8.21.0'
Older tutorials use the artifact bucket4j-core and the methods Bandwidth.classic(...) and Refill.intervally(...), which are deprecated in current versions. This post uses the current builder API.
A bucket with a capacity of 10 tokens, refilled with 10 tokens every minute:
1
2
3
Bucket bucket = Bucket.builder()
    .addLimit(limit -> limit.capacity(10).refillIntervally(10, Duration.ofMinutes(1)))
    .build();
Bucket4j offers two ways to refill:
refillIntervally(10, Duration.ofMinutes(1))waits until the whole minute has passed, then adds all 10 tokens at once. A client that sends 10 requests in the first 15 seconds must wait 45 seconds for the next one.refillGreedy(10, Duration.ofMinutes(1))adds tokens gradually, one every 6 seconds. Clients get a steadier flow, and the 11th request only waits a few seconds.
The Example: A Random Quote API
The API returns a random quote about software. A repository reads the quotes from a text file, a service picks a random one, and a REST controller exposes it:
1
2
3
4
5
6
7
8
9
10
11
12
13
14
15
@RestController
@RequestMapping("/v1")
public class QuoteController {

  private final QuoteService quoteService;

  public QuoteController(QuoteService quoteService) {
    this.quoteService = quoteService;
  }

  @GetMapping(value = "/quotes/random", produces = MediaType.APPLICATION_JSON_VALUE)
  public Quote getQuote() {
    return quoteService.getRandomQuote();
  }
}
A client such as Postman gets a quote:
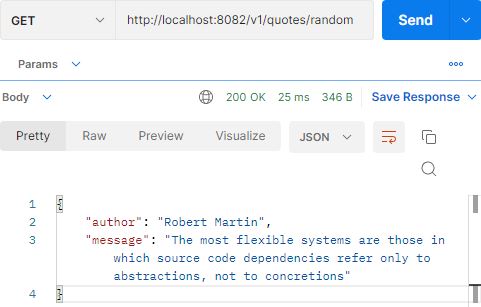
Real clients, though, are programs. In B2B integrations, developers on the client side often send hundreds of requests per minute while they test their implementation. That’s the traffic we want to limit.
The Rate Limit Interceptor
A Spring MVC HandlerInterceptor runs before the controller. If its preHandle method returns false, the request never reaches the controller, which makes it the right place for the limit. The controller doesn’t need to know that rate limiting exists.
We give each client its own bucket. In this example, the client is identified by its IP address. With API keys or OAuth2, the client ID is a better key.
1
2
3
4
5
6
7
8
9
10
11
12
13
14
15
16
17
18
19
20
21
22
23
24
25
26
27
28
29
30
31
32
33
34
35
36
@Component
public class RateLimitInterceptor implements HandlerInterceptor {

  private static final long CAPACITY = 10;
  private static final Duration REFILL_PERIOD = Duration.ofMinutes(1);

  // One bucket per client IP. Buckets of clients that stay idle for 10 minutes are removed.
  private final Cache<String, Bucket> buckets = Caffeine.newBuilder()
      .expireAfterAccess(Duration.ofMinutes(10))
      .maximumSize(100_000)
      .build();

  @Override
  public boolean preHandle(HttpServletRequest request, HttpServletResponse response, Object handler) {
    String clientIp = request.getRemoteAddr();
    Bucket bucket = buckets.get(clientIp, ip -> newBucket());

    ConsumptionProbe probe = bucket.tryConsumeAndReturnRemaining(1);
    if (probe.isConsumed()) {
      response.addHeader("X-Rate-Limit-Remaining", Long.toString(probe.getRemainingTokens()));
      return true;
    }

    long waitMillis = TimeUnit.NANOSECONDS.toMillis(probe.getNanosToWaitForRefill());
    response.setStatus(HttpStatus.TOO_MANY_REQUESTS.value()); // 429
    response.addHeader("Retry-After", Long.toString((waitMillis + 999) / 1000)); // seconds, rounded up
    response.addHeader("X-Rate-Limit-Retry-After-Milliseconds", Long.toString(waitMillis));
    return false;
  }

  private Bucket newBucket() {
    return Bucket.builder()
        .addLimit(limit -> limit.capacity(CAPACITY).refillIntervally(CAPACITY, REFILL_PERIOD))
        .build();
  }
}
What each part does:
buckets.get(clientIp, ip -> newBucket())returns the client’s bucket, or creates a new one on the client’s first request. The cache is thread-safe, so two simultaneous first requests from the same client can’t create two buckets.- The cache comes from the Caffeine library. A plain
HashMapwould keep a bucket for every IP that ever called your API, and memory would grow forever. Here, buckets of idle clients expire after 10 minutes, which is longer than the refill period, so expiry never resets an active limit. tryConsumeAndReturnRemaining(1)takes one token if there is one. The probe says whether it succeeded, how many tokens are left, and how long the client must wait otherwise.- The response headers tell the client where it stands.
Retry-Afteris the standard HTTP header, in seconds, which clients and proxies understand.X-Rate-Limit-RemainingandX-Rate-Limit-Retry-After-Millisecondsgive more detail.
With Spring Boot 3 or 4, the servlet classes come from jakarta.servlet. On Spring Boot 2, use javax.servlet.
The Real Client IP
Many tutorials read the client IP from the X-Forwarded-For header. Don’t do this yourself. Any client can send that header with a made-up IP, a different one on every request, and is never limited.
Use request.getRemoteAddr() and let Spring Boot handle the header. When your application runs behind a load balancer or a reverse proxy, add this to application.properties:
1
server.forward-headers-strategy=native
The embedded server then takes the client IP from X-Forwarded-For only when the request comes from a trusted, internal proxy address. A header sent directly by a client from the Internet is ignored.
Register the Interceptor
1
2
3
4
5
6
7
8
9
10
11
12
13
14
@Configuration
public class InterceptorConfig implements WebMvcConfigurer {

  private final RateLimitInterceptor rateLimitInterceptor;

  public InterceptorConfig(RateLimitInterceptor rateLimitInterceptor) {
    this.rateLimitInterceptor = rateLimitInterceptor;
  }

  @Override
  public void addInterceptors(InterceptorRegistry registry) {
    registry.addInterceptor(rateLimitInterceptor).addPathPatterns("/v1/**");
  }
}
addPathPatterns applies the limit to the API only, not to health checks or documentation. Older tutorials extend WebMvcConfigurerAdapter, which was removed in Spring 6, so that code doesn’t compile on Spring Boot 3 or 4.
The interceptor handles rate limiting, the controller handles HTTP, and the service handles the business logic. Each class has one job, so you can change the limit without touching the API. Designing classes this way is what my book is about:
Software design principles provide guidelines to handle the design process’s complexity, prepare your code when changes arise, and minimize the impact of introducing bugs. – Software Design Principles

See It Work
Ten requests from the same client within a minute succeed, and the 11th is rejected:
1
2
3
4
5
6
7
8
9
10
$ curl -i http://localhost:8082/v1/quotes/random
HTTP/1.1 200
X-Rate-Limit-Remaining: 9
...
HTTP/1.1 200
X-Rate-Limit-Remaining: 0

HTTP/1.1 429
Retry-After: 60
X-Rate-Limit-Retry-After-Milliseconds: 59142
A request from another client still gets 200 with X-Rate-Limit-Remaining: 9, because every client has its own bucket.
A Bug to Avoid: The Shared Bucket
An earlier version of this post, like several tutorials online, had this code:
1
2
3
4
5
6
7
8
private final Bucket defaultBucket = Bucket.builder()...build();

if (buckets.containsKey(clientIP)) {
  bucket = buckets.get(clientIP);
} else {
  bucket = this.defaultBucket;     // the same object for every new client
  buckets.put(clientIP, bucket);
}
It looks like one bucket per client, but every client gets the same bucket object. The limit is then 10 requests per minute for all clients together: in a test, client A sent 10 requests and all were served, and client B then got 0 of its 10. Always create a new bucket per client, as newBucket() does above.
Production Notes
- Several instances of your API: each instance has its own buckets in memory, so with three instances a client gets three times the limit. Store the buckets in a shared store instead. Bucket4j supports Redis, Hazelcast, and databases such as PostgreSQL and MySQL.
- Limits per plan: look up the client’s plan and create the bucket with that plan’s capacity, for example 10 requests per minute on the free plan and 1,000 on the paid plan.
- Know your traffic first: before you choose limits, measure how many requests per minute your clients actually send. A hot-warm architecture in Elasticsearch is one way to store and analyze those logs.
Shared state across instances, replication and consistency are exactly the problems this book explains better than any other:
Get the Code
The complete project, with Spring Boot 4.1, Bucket4j 8.21 and tests for the limit, is on GitHub: https://github.com/mgamio/rateLimit.
Where to Go Next
- Load-test the rate limit with concurrent Java clients: simulate several clients and watch the 429 responses arrive.
- Handle 503 errors in the client: retry carefully when the server is overloaded.
- REST API tutorial: resources, HTTP methods and status codes, the series’ starting point.
“Design a rate limiter” is one of the classic system design interview questions. Practice with real interview questions:

“If this article helped you, help me create the next one.”
☕ Buy me a coffee