
How to implement Spring Boot Security OAuth2 with OpenAPI
This tutorial will show how to integrate OAuth2 with Spring Security in a Spring Boot application with OpenAPI 3.
The Spring Boot application I am going to use is based on my previous article: Documenting a SpringBoot REST API with OpenAPI 3
OAuth
OAuth is an authorization framework many companies use to secure access to their protected resources. It performs this by using access tokens.
The token represents a delegated right of access on behalf of the resource owner.
Roles
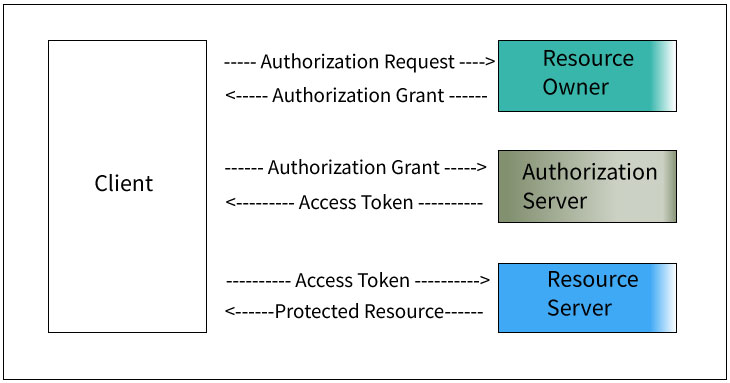
OAuth defines four roles
-
The Resource Owner is the user who grants access to a protected resource.
-
Resource Server stores users’ data and HTTP services and responds to protected resource requests using access tokens.
-
The client is the application that requires access to protected resources on behalf of the resource owner and its authorization.
-
The authorization server is responsible for authenticating the user’s identity and giving an authorization token.
Authorization grant
An authorization grant is a credential representing the resource owner’s authorization used by the client to obtain an access token.
OAuth2 defines four grant types.
-
Authorization Code, for web apps that are server-side apps
-
Implicit, optimized for clients implemented in a browser using a scripting language such as JavaScript
-
Resource Owner Password Credentials are used when there is a high degree of trust between the resource owner and the client
-
Client Credentials are used when the client is requesting access to protected resources based on an authorization previously arranged with the authorization server.
The Client Credentials grant type is the most appropriate for server-to-server applications, such as typical B2B interactions.
Getting Started
To integrate OAuth2 in a Spring Boot application, we add the Spring Oauth dependency to our pom.xml file.
1
2
3
4
5
<dependency>
  <groupId>org.springframework.security.oauth.boot</groupId>
  <artifactId>spring-security-oauth2-autoconfigure</artifactId>
  <version>2.5.1</version>
</dependency>
Enable Authorization Server Support
We open the main application class and add @EnableAuthorizationServer to enable the support for the authorization server.
1
2
3
4
5
6
7
@EnableAuthorizationServer
@SpringBootApplication
public class OpenapiApplication {
	public static void main(String[] args) {
		SpringApplication.run(OpenapiApplication.class, args);
	}
}

@EnableAuthorizationServer enables the client credentials grant type by default.
Creating ClientId and Client Secret
Open/create the resources/application.yml file and add the following properties:
1
2
3
4
5
6
7
8
security:
  oauth2:
    client:
      client-id: codercuy-client
      client-secret: strong-secret
      scope:
        - read
        - write
We need to tell Spring which endpoints -resources- must be authenticated. Otherwise, all requests will skip security.
Enable Resource Server Support
Create a class that extends ResourceServerConfigurerAdapter and add the following code.
1
2
3
4
5
6
7
8
9
10
11
12
@Configuration
@EnableResourceServer
public class OAuth2ResourceServer extends ResourceServerConfigurerAdapter
{
  @Override
  public void configure(HttpSecurity http) throws Exception {
    http
            .authorizeRequests()
            .antMatchers("/api/**").authenticated()
            .antMatchers("/").permitAll();
  }
}
Now, run the main application.
http://localhost:8080/swagger-ui.html
Battle-Tested by the Toughest Interviewers in Tech

And try to insert a book (Try out button). In the bookAuthorization parameter, write anything (“key,” for example).
Then you receive an error.

Why does this happen? Well, we need to tell OpenAPI that configures security.
Configure OpenAPI and Oauth2
To integrate OpenAPI 3 with OAuth2, open the OpenApiConfig class and add the new code.
1
2
3
4
5
6
7
8
9
10
11
12
13
14
15
16
17
18
19
20
21
22
23
24
25
26
27
28
29
30
@Configuration
public class OpenApiConfig {

  @Bean
  public OpenAPI customOpenAPI() {
    return new OpenAPI()
        .components(new Components()
                .addSecuritySchemes("spring_oauth", new SecurityScheme()
                        .type(SecurityScheme.Type.OAUTH2)
                        .description("Oauth2 flow")
                        .flows(new OAuthFlows()
                                .clientCredentials(new OAuthFlow()
                                        .tokenUrl("http://localhost:8080" + "/oauth/token")
                                        .scopes(new Scopes()
                                                .addString("read", "for read operations")
                                                .addString("write", "for write operations")
                                        ))))
        )
            .security(Arrays.asList(
                    new SecurityRequirement().addList("spring_oauth")))
        .info(new Info()
            .title("Book Application API")
            .description("This is a sample Spring Boot RESTful service using springdoc-openapi and OpenAPI 3.")
            .termsOfService("terms")
            .contact(new Contact().email("codersitedev@gmail.com").name("Developer: Moises Gamio"))
            .license(new License().name("GNU"))
            .version("2.0")
        );
  }
}
Discover how to design software that can handle the demands of modern applications and user expectations.

From the previous code, you can see that before setting up a security requirement in OpenAPI, we need to define a new security scheme component called “spring_oauth” for example.
Now, rerun the main application, and we can see a new green button called Authorize. Then enter the credentials and the scope.

Close the pop-up and try out again to insert a book.

Yes, you did it!
Now, your endpoints are secured and protected with OAuth2.
Please donate to maintain and improve this website if you find this content valuable.